This is Part 4 of my AI coding workflow series. Part 1 covers terminal agents. Part 2 covers editor-level AI. Part 3 covers PR-level agents. Part 5 (coming soon) covers the skills system. This post is about running a persistent AI agent on a remote server using OpenClaw.
Updated April 2026 after two months of daily use. This post focuses on the setup.
A note on timing: the AI tooling space moves fast. The tools, versions, and prices here are a snapshot of what I use right now, not a fixed recipe, and some details will date quickly. I keep these posts updated as my workflow shifts.
At a glance
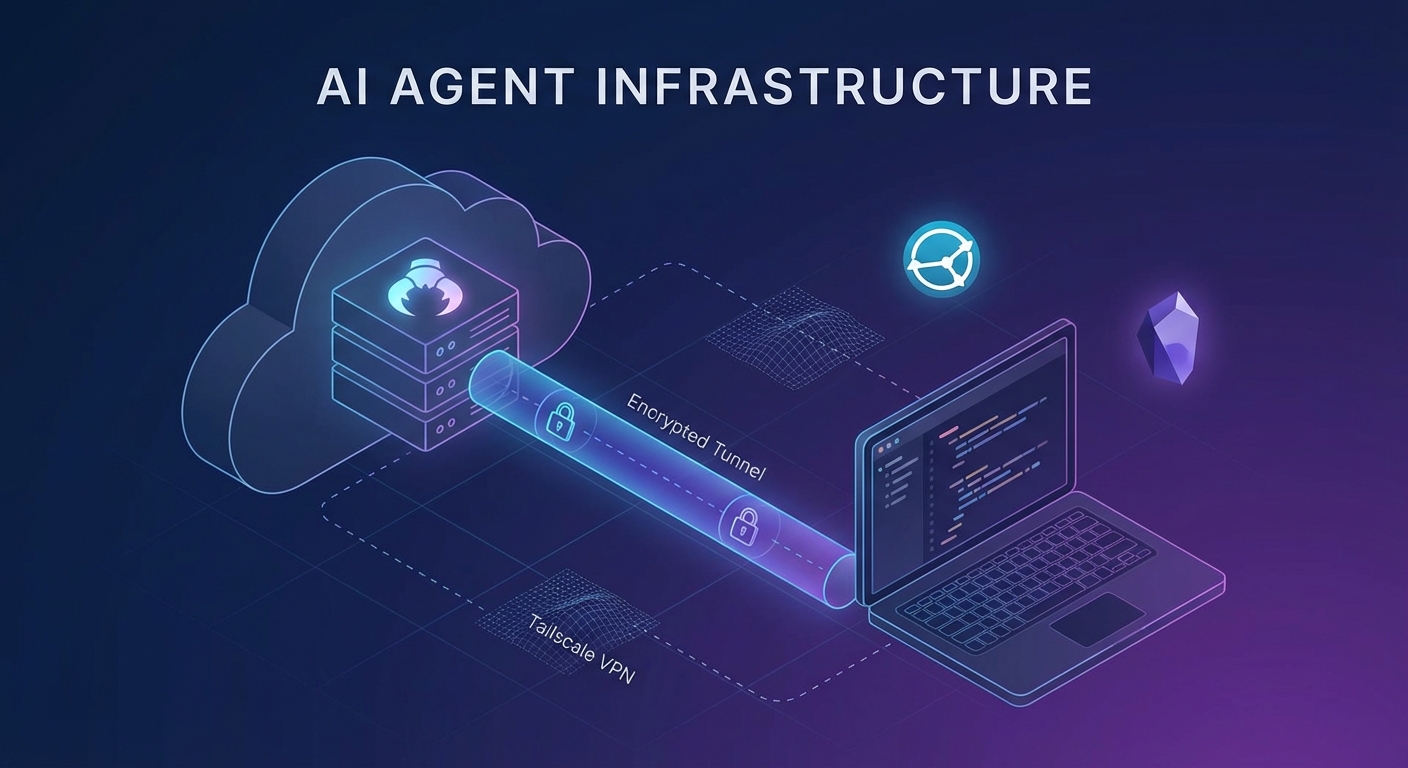
Think of this setup as giving yourself a second computer that never sleeps, only lets you in through a private door, and quietly keeps a copy of its notes on your Mac.
- The VPS is a cheap always-on Linux box that hosts the agent (OpenClaw).
- Tailscale is the private door — a VPN that only your own devices can use.
- Syncthing keeps a folder of notes and agent output in sync between the server and your Mac.
- Obsidian reads that folder on your Mac like a normal vault.
You don't need to understand networking, VPNs, or file sync in depth to run this. You need an SSH client and the patience to copy-paste a few commands. Everything below is organised so you can skip to the parts that apply to you.
If you already know why you want this, the cheat sheet near the end has the commands grouped together. The sections in between explain the why.
Why run an AI agent on a VPS?
Running AI agents locally works, but has limitations:
- My laptop sleeps, travels, runs out of battery
- Long-running tasks get interrupted
- Can't easily hand off to mobile or other devices
The fix: run OpenClaw on a cheap VPS that's always on, accessible from anywhere via Tailscale VPN, with automatic backups to my Obsidian vault via Syncthing.
I recommend DigitalOcean for this setup because the lowest-tier droplets are enough to run OpenClaw, Tailscale, and Syncthing reliably.
Here's the stack:
┌─────────────────┐     ┌─────────────────┐
│   Your Mac      │────▶│  Tailscale VPN  │
│   (Obsidian)    │◀────│  (encrypted)    │
└─────────────────┘     └─────────────────┘
                               │
                               ▼
                        ┌─────────────────┐
                        │  DigitalOcean   │
                        │  VPS (~£10/mo)  │
                        │  ─────────────  │
                        │  OpenClaw       │
                        │  Syncthing      │
                        │  Tailscale      │
                        └─────────────────┘
Not technical? Use an AI assistant
If you're not comfortable with command-line setup, you can use Claude Code or Codex directly on your server to do it for you.
Once you have SSH access to your VPS:
# Install Node.js first (required for terminal AI tools)
curl -fsSL https://deb.nodesource.com/setup_22.x | sudo -E bash -
sudo apt install -y nodejs

# Then install your preferred AI coding assistant:
# Option A: Claude Code
sudo npm install -g @anthropic-ai/claude-code

# Option B: Codex CLI
sudo npm install -g @openai/codex
Then run claude or codex and authenticate. Once connected, ask it to:
"I have already installed Node.js. Now, follow this guide to set up OpenClaw with Tailscale and Syncthing. My username is
<your_user>."
The AI can run the commands, troubleshoot errors, and adapt to your setup. Once OpenClaw is running, it becomes that assistant permanently.
1. DigitalOcean VPS setup
Create the droplet
- Sign up / log in at DigitalOcean
- Click Create → Droplets
- Choose your configuration:
- Region: Pick something geographically close to you (e.g. London or Singapore)
- Image: Ubuntu 24.04 LTS
- Size: Regular (shared CPU), 2GB / 1 vCPU (~£10/mo) is plenty. The AI runs in the cloud; the VPS just needs to run the CLI and Syncthing
- Authentication: SSH Key (we'll set this up next)
- Give it a hostname like
openclawand create it - Note the public IP address once it's provisioned
Initial server hardening
Once you can SSH in, do the basics:
# Update everything
apt update && apt upgrade -y

# Create a non-root user (replace <your_user> with your username)
adduser <your_user>
usermod -aG sudo <your_user>

# Copy your SSH key to the new user
mkdir -p /home/<your_user>/.ssh
cp ~/.ssh/authorized_keys /home/<your_user>/.ssh/authorized_keys
chown -R <your_user>:<your_user> /home/<your_user>/.ssh
chmod 700 /home/<your_user>/.ssh
chmod 600 /home/<your_user>/.ssh/authorized_keys

# Disable root login and password auth
sed -i 's/^#*PermitRootLogin.*/PermitRootLogin no/' /etc/ssh/sshd_config
sed -i 's/^#*PasswordAuthentication.*/PasswordAuthentication no/' /etc/ssh/sshd_config
systemctl restart sshd
Install Node.js
OpenClaw requires Node.js:
curl -fsSL https://deb.nodesource.com/setup_22.x | sudo -E bash -
sudo apt install -y nodejs
node --version  # confirm v22+
Install OpenClaw
Two commands, one *agent*.
Check the OpenClaw documentation for configuration options.
2. Tailscale VPN setup
Tailscale gives you a private, encrypted mesh network between your devices. No need to expose SSH to the public internet.
Install on the VPS
curl -fsSL https://tailscale.com/install.sh | sh
sudo tailscale up
This prints an auth URL. Open it, log in to your Tailscale account (or create one), and authorise the device.
Install on your Mac
# Via Homebrew
brew install --cask tailscale

# Or download from https://tailscale.com/download/mac
Open the Tailscale app, sign in with the same account, and connect.
Verify the connection
# On your Mac, check both devices are visible
tailscale status

# You should see both your Mac and the VPS listed with their Tailscale IPs (100.x.x.x)
Disable key expiry (recommended for servers)
In the Tailscale admin console:
- Find your VPS machine
- Click the
...menu → Disable key expiry
This prevents the VPS from dropping off the network when the auth key expires.
3. SSH key setup on Mac
Generate a key
# Ed25519 is modern and preferred
ssh-keygen -t ed25519 -C "your-email@example.com"

# Accept the default path (~/.ssh/id_ed25519)
# Set a passphrase (recommended)
Add the public key to DigitalOcean
Either:
- During droplet creation: Paste the contents of
~/.ssh/id_ed25519.pubinto the SSH key field - After creation: Copy it to the server manually:
ssh-copy-id -i ~/.ssh/id_ed25519.pub root@<DROPLET_PUBLIC_IP>
Set up your SSH config
Edit ~/.ssh/config:
Host openclaw
    HostName 100.x.x.x  # Tailscale IP of your VPS
    User <your_user>
    IdentityFile ~/.ssh/id_ed25519
Now you can just run ssh openclaw from anywhere on your Tailscale network.
4. Accessing via Tailscale only
Once both your Mac and the VPS are on Tailscale, stop using the public IP for SSH and use the Tailscale IP instead.
Lock down the firewall
On the VPS, restrict SSH to only Tailscale:
# Allow SSH only on the Tailscale interface
sudo ufw default deny incoming
sudo ufw default allow outgoing
sudo ufw allow in on tailscale0 to any port 22
sudo ufw enable
SSH is now only accessible through your Tailscale VPN, not from the public internet.
MagicDNS (optional)
Tailscale's MagicDNS lets you use hostnames instead of IPs:
ssh <your_user>@openclaw # if your machine is named "openclaw" in Tailscale
Enable it in the Tailscale admin console under DNS → MagicDNS.
5. Obsidian setup
Obsidian is a markdown-based knowledge management tool. We'll use it to store conversation logs and project files from the agent.
Install on Mac
Download from obsidian.md or:
brew install --cask obsidian
Create your vault
- Open Obsidian
- Create new vault → name it something like
openclaw-vault - Choose a location, e.g.
~/Documents/openclaw-vault - This is where all your synced files will live
Recommended vault structure
openclaw-vault/
├── clawd/              # ← synced from the server
│   ├── projects/
│   ├── conversations/
│   └── memory/
├── notes/              # Your own notes
├── templates/          # Obsidian templates
└── README.md
6. Syncthing: bidirectional vault sync
Syncthing provides continuous, encrypted, peer-to-peer file sync. No cloud middleman.
Install on the VPS
# Add the Syncthing repo
sudo curl -o /usr/share/keyrings/syncthing-archive-keyring.gpg \
  https://syncthing.net/release-key.gpg

echo "deb [signed-by=/usr/share/keyrings/syncthing-archive-keyring.gpg] \
  https://apt.syncthing.net/ syncthing stable" | \
  sudo tee /etc/apt/sources.list.d/syncthing.list

sudo apt update
sudo apt install -y syncthing
Run as a systemd service
# Enable and start for your user
sudo systemctl enable syncthing@<your_user>
sudo systemctl start syncthing@<your_user>

# Check it's running
systemctl status syncthing@<your_user>
Install on Mac
brew install syncthing
brew services start syncthing
Access the Syncthing web UI
On your Mac, Syncthing's UI runs at http://127.0.0.1:8384.
For the VPS, access it via SSH tunnel:
ssh -L 8385:localhost:8384 openclaw
Then open http://127.0.0.1:8385 in your browser.
Connect the devices
- On the Mac's Syncthing UI: go to Actions → Show ID and copy the device ID
- On the VPS's Syncthing UI: click Add Remote Device and paste the Mac's device ID
- Accept the pairing on both sides
Share the Obsidian vault folder
- On the Mac's Syncthing UI: click Add Folder
- Folder Path:
~/Documents/openclaw-vault - Folder ID:
openclaw-vault(must match on both sides) - Share with: your VPS device
- Folder Path:
- On the VPS, accept the incoming folder share
- Set the folder path to
/home/<your_user>/openclaw-vault
- Set the folder path to
Verify sync
Create a test file on your Mac:
echo "sync test" > ~/Documents/openclaw-vault/test.md
After a few seconds, check on the VPS:
cat ~/openclaw-vault/test.md
# Should show "sync test"
Syncthing ignore patterns
Create a .stignore file in the vault root to skip files you don't need synced:
// .stignore
.obsidian/workspace.json
.obsidian/workspace-mobile.json
.DS_Store
*.tmp
Multiple shared folders
Once Syncthing is working for the vault, it's trivial to add more folders. I run two: obsidian-vault for knowledge/notes and media-output for agent-generated media (video/audio/images) so I can review them on my Mac without SSH'ing in.
The same Add Folder dialog handles this. Give each folder a unique ID and keep the scope tight — syncing an entire $HOME is asking for lock conflicts and 20 GB of node_modules churning through Syncthing's hashing pipeline.
7. Link OpenClaw to your vault
Configure OpenClaw to write directly into the synced vault.
Option A: Direct path (recommended)
Set your clawd working directory to be inside the vault:
# OpenClaw writes directly to the vault
mkdir -p /home/<your_user>/openclaw-vault/clawd

# Set this path as workspace in your openclaw config
# agents.defaults.workspace in ~/.openclaw/openclaw.json
Option B: Symlink
If you prefer keeping clawd in its own location:
mkdir -p /home/<your_user>/clawd
ln -s /home/<your_user>/clawd /home/<your_user>/openclaw-vault/clawd
Note: If using symlinks, enable "Follow Symlinks" in Syncthing's folder settings under Advanced.
What this gives you
Once wired up:
- OpenClaw writes files, logs, and project data to the vault
- Syncthing picks up changes and syncs them to your Mac
- Obsidian on your Mac sees everything with full markdown rendering
- Changes flow both ways: add notes in Obsidian and they sync back to the server
8. Secure web access with Tailscale Serve
OpenClaw has a web interface. Instead of exposing it to the public internet, use Tailscale Serve to make it accessible only within your Tailscale network.
Why Tailscale Serve?
I've written a deeper dive on using Tailscale Serve for zero-trust service exposure. The short version:
- Services only accessible from devices on your Tailscale network
- Automatic HTTPS with valid certificates for your
*.ts.netdomain - Works through NATs and firewalls without port forwarding
Set up Tailscale Serve
On the VPS, expose the OpenClaw gateway (default port 18789):
# Serve the gateway over HTTPS on your Tailscale network
sudo tailscale serve --bg https / http://localhost:18789
This makes the service available at https://<your-vps-hostname>.<tailnet-name>.ts.net/.
Exposing multiple services
In practice, the VPS ends up hosting more than just OpenClaw. Mine currently serves the gateway, a workstream dashboard (Agent Control Center), Syncthing, an AI pipeline UI, and a lead-gen dashboard — all reachable only from my tailnet.
# OpenClaw gateway on /
sudo tailscale serve --bg https / http://localhost:18789

# Syncthing UI on a separate port
sudo tailscale serve --bg --https=8384 http://localhost:8384

# Agent Control Center (workstream dashboard)
sudo tailscale serve --bg --https=1337 http://localhost:1337
sudo tailscale serve --bg --https=1338 http://localhost:1338  # API

# AI pipeline dashboard + API
sudo tailscale serve --bg --https=5173 http://localhost:5173
sudo tailscale serve --bg --https=3001 http://localhost:3001
Check running services
tailscale serve status
Access from any device
Once configured, access your services from any device on your Tailscale network:
- Mac/PC: Open
https://openclaw.<your-tailnet>.ts.net/in browser - Mobile: Install Tailscale app, connect, then access the same URL
Security notes
- Only devices authenticated to your Tailscale network can access these URLs
- You can further restrict access using Tailscale ACLs
- No need to open any ports on your firewall
9. Gateway web UI and device pairing
When you first visit the OpenClaw web UI, you might see "disconnected (1008): pairing required". The gateway needs to approve your browser as a trusted device.
Approve your browser
On the VPS, check for pending device requests:
openclaw devices list
You'll see something like:
Pending (1)
┌──────────────────────────────────────┬────────────────────────────────────┬──────────┐
│ Request                              │ Device                             │ Role     │
├──────────────────────────────────────┼────────────────────────────────────┼──────────┤
│ 44e05baf-ae0b-4a5f-b640-04195b8acca9 │ 2286fb5a55e891dcb8f6c8c76645c387...│ operator │
└──────────────────────────────────────┴────────────────────────────────────┴──────────┘
Approve it:
openclaw devices approve <request-id>
Refresh the browser and you should be connected.
Getting your gateway token
If the UI prompts for a token, find it in your config:
grep '"token"' ~/.openclaw/openclaw.json
Or check ~/.openclaw/openclaw.json under gateway.auth.token.
Managing devices
# List all devices (pending and paired)
openclaw devices list

# Revoke a device
openclaw devices revoke <device-id>

# Rotate a token
openclaw devices rotate <role>
A couple of practical extras
Two small quality-of-life things that aren't required but you'll want eventually.
Keep long-running services alive with tmux. Once you start running support services (dashboards, scrapers) alongside OpenClaw, use tmux so they don't die when you close your SSH session:
tmux new -s myservice  # start a named session
# ... run your service ...
# ctrl-b then d to detach
tmux attach -t myservice  # come back later
For anything you depend on, graduate to a systemd service. tmux is for development.
Let the agent use git without passphrase prompts. Install keychain so an SSH key gets loaded once per login and stays available to every shell — including the ones OpenClaw spawns:
sudo apt install keychain
ssh-keygen -t ed25519 -f ~/.ssh/dev_server_key

# Add to ~/.bashrc or ~/.zshrc:
eval "$(keychain --eval --quiet ~/.ssh/dev_server_key)"
Now git pull and git push work without you being there.
Quick reference
| Component | Mac | VPS |
|---|---|---|
| Tailscale | App or brew install --cask tailscale | curl -fsSL https://tailscale.com/install.sh | sh |
| SSH | ssh openclaw (via ~/.ssh/config) | Locked to Tailscale interface only |
| Syncthing | brew install syncthing → localhost:8384 | apt install syncthing → systemd service |
| Obsidian | brew install --cask obsidian | Not needed on server |
| OpenClaw | Optional (for local use) | npm install -g openclaw |
| tmux | Not needed | apt install tmux — keeps services running |
| keychain | Not needed | apt install keychain — SSH without passphrase prompts |
Ports and access
| Service | Port | Access |
|---|---|---|
| SSH | 22 | Tailscale only (tailscale0 interface) |
| OpenClaw Gateway | 18789 | Tailscale Serve (https://<hostname>.<tailnet>.ts.net/) |
| Syncthing Web UI | 8384 | Localhost or Tailscale Serve |
| Syncthing Sync | 22000 | Tailscale only |
| Agent Control Center | 1337 | Tailscale Serve (optional — workstream dashboard) |
| Agent Control Center API | 1338 | Tailscale Serve (optional) |
| AI Pipeline Dashboard | 5173 | Tailscale Serve (optional) |
| AI Pipeline API | 3001 | Tailscale Serve (optional) |
Troubleshooting
Syncthing not syncing?
Check systemctl status syncthing@<your_user> on the VPS. Make sure both devices show as "Connected" in the web UI.
Can't SSH via Tailscale?
Run tailscale status on both devices. If the VPS shows as offline, run sudo tailscale up again.
Symlink not syncing? Enable "Follow Symlinks" in Syncthing's folder settings, or switch to the direct path approach.
Obsidian not seeing new files? Obsidian watches the filesystem, but large syncs can take a moment. Try closing and reopening the vault.
OpenClaw auth issues?
Run openclaw doctor on the VPS to check auth status. See OpenClaw authentication docs for setup.
Gateway shows "pairing required"?
Run openclaw devices list and approve the pending request with openclaw devices approve <request-id>.
10. What this grew into
Two months on, the single OpenClaw instance has become a small operations team. Not metaphorically — I literally have five specialist agents (Finance, Sales, Technology, Ops, Marketing), each with its own workspace, its own Slack channel, and a shared daily rhythm.
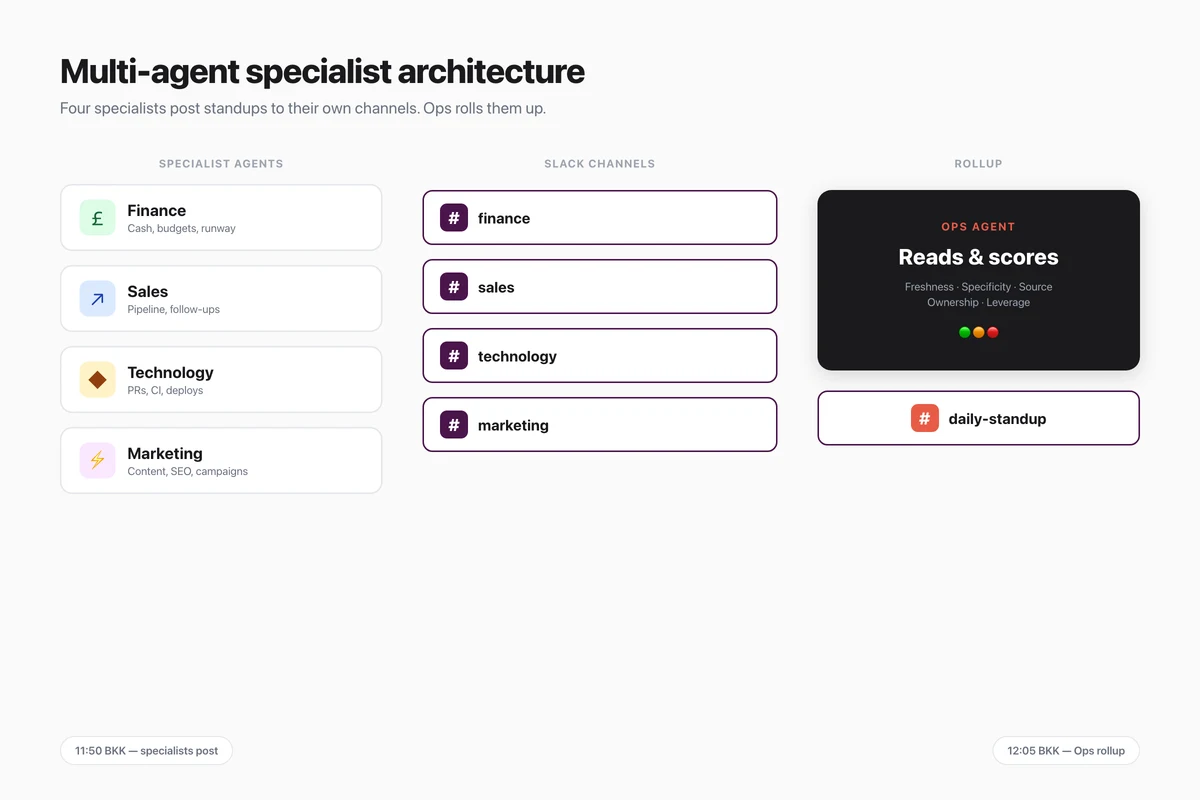
Every morning at 9am, they each post a standup to their own channel. Fifteen minutes later the Ops agent reads the other four, scores them for quality, and posts a single cross-team rollup to a shared channel. A budget agent runs in the evening. A security audit agent runs overnight. An Agent Control Center dashboard (Tailscale-only) sits on top of the whole thing so I can see what every agent is doing without opening five Slack channels.
None of this needed extra infrastructure. The VPS built in this post is the foundation. The specialist layer is just workspace folders, system prompts, and scheduled crons on top of it.
Series Navigation
AI Coding Workflow Series:
- Part 1: Terminal Agents — Claude Code, OpenCode, session-level orchestration
- Part 2: Editor-Level AI — Zed, inline completions, agent panels
- Part 3: PR-Level Agents — GitHub Apps, automated review
- Part 4: Persistent VPS Agent (this post) — OpenClaw, Tailscale, Syncthing
- Part 5: Claude Code Skills Setup (coming soon) — extending Claude Code with custom and vendor skills.
Related
- My Developer Second Brain — How the Obsidian side of this setup works
- Tailscale Serve for Zero-Trust Services — Deeper dive on the networking layer